

What Makes a Good Trade Setup? The 5 Gates Every Candidate Must Pass
**What makes a good trade setup** is not a single magic signal — it is a stack of conditions that all have to be true at the same time. A real setup has a genuine impulse leg behind it, a pullback into a sensible zone, a candle that actually confirms the level, a market that is trending rather than chopping, and a reward that is worth the risk you are taking. Miss any one of those and you don't have a setup — you have a chart you *wish* was a setup.
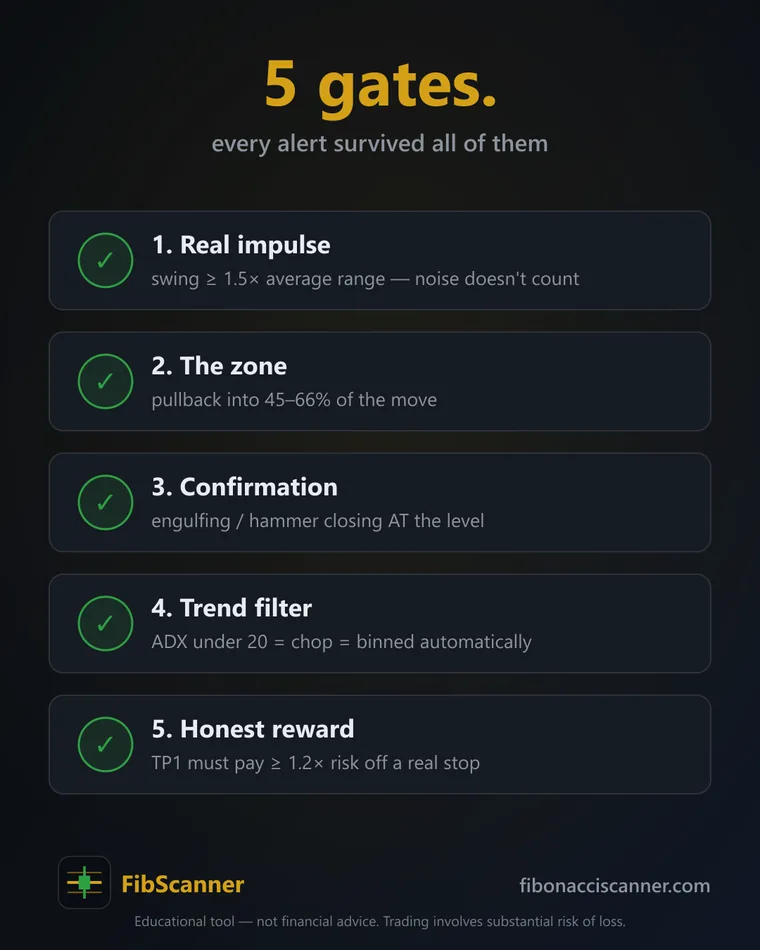
Most of what looks tradable on a chart is noise dressed up as opportunity. The job of a disciplined trader is not to find reasons to enter; it's to find reasons to reject. This guide breaks the decision into five hard gates — a trade setup checklist a candidate must pass in order, front to back. It's the exact logic a scanner should apply on your behalf, and the same logic you can run by eye on any chart in any market.
Think of the five gates as a filter, not a wishlist. A candidate that fails at Gate 1 never reaches Gate 2. That is by design. If everything passed, the filter would be doing nothing.
What makes a good trade setup?
A real setup is one where several independent conditions agree; noise is one condition dressed up to look like more. The single biggest mistake new traders make is treating one attractive feature — "price is at the 61.8% level!" — as a complete reason to enter, when in reality that level means almost nothing without an impulse behind it, a confirmation in front of it, and a trend around it.
Here is the uncomfortable truth: the market produces far more almost-setups than real ones. Price touches Fibonacci levels constantly. Candles form patterns constantly. Support and resistance get "respected" and then blown through constantly. If your bar for entry is "something interesting happened near a level," you will trade all day and wonder why nothing holds together.
The fix is to define the setup as a sequence of gates, each of which can veto the trade. Below is the whole checklist at a glance; the rest of the article works through each gate in order.
| Gate | The question it answers | Fails when… |
|---|---|---|
| 1. Impulse | Is there real force behind the move? | The prior leg is small, overlapping, or directionless |
| 2. Pullback | Did price retrace into the zone? | The pullback is too shallow or blows past the zone |
| 3. Confirmation | Did a candle close at the level? | Price only wicks the level and keeps going |
| 4. Trend | Is the market actually trending? | The market is ranging/choppy (weak trend reading) |
| 5. Risk:reward | Is the payoff worth the stop? | The stop is wide and the target is close |
Every gate is a veto. Passing four out of five is not "80% of a setup" — it's a reject. That framing is what turns a chart-watcher into a trader.
Gate 1: Is there a genuine impulse leg?
The impulse is the origin of everything. Before you care about a level, a pullback, or a candle, you need proof that one side of the market took control and moved price with force. No impulse, no setup — full stop.
An impulse leg is a directional move with follow-through: bodies that trend, minimal overlap between candles, and a clear displacement from where it started to where it ended. It's the market's way of showing intent. When buyers overwhelm sellers (or vice versa) over a run of candles, that leg becomes the reference move you'll measure your retracement against.
Contrast that with the fake version. A cluster of overlapping candles that drifts up a little, down a little, and net-travels almost nowhere is not an impulse — it's congestion. If you draw a Fibonacci retracement across congestion, your levels are meaningless because the leg they're built on had no conviction. Garbage leg in, garbage levels out.
What a genuine impulse looks like in practice:
- Displacement: the end of the leg is clearly far from the start, not a rounding wander.
- Body dominance: candles are mostly body, not mostly wick — the move closed where it went.
- One-directional pressure: few deep counter-candles inside the leg.
- A definable swing high and swing low: you can point to exactly where the leg begins and ends, which is what makes the retracement measurable.
This is also why the measurement matters so much. If you're going to build Fibonacci levels off this leg, you need clean anchor points — the step-by-step method for drawing a Fibonacci retracement starts with exactly this: identify a real impulse, then anchor swing-to-swing. Get the leg right and the rest of the gates have something genuine to work with.
Gate 2: Did price pull back into the zone?
A setup needs a pullback that reaches the zone — not a shallow dip, and not a collapse. After an impulse, price should retrace part of that move and stall inside a specific band: roughly the 45–66% retracement of the impulse leg. That band is where the golden pocket lives.
The golden pocket is the 0.618–0.65 retracement zone where price has given back enough of the impulse to offer a reasonable entry, but not so much that the original move is in doubt. The 50% level often sits in the same neighborhood and acts as a psychological midpoint. Together they form the zone a quality pullback is supposed to reach.
Why this band not, say, a 23.6% dip or an 80% retrace?
- Too shallow (under ~38%): price barely paused. You'd be entering into a move that never gave you a real discount, with your stop uncomfortably far below.
- Into the zone (~45–66%): price gave back a meaningful chunk of the impulse and found interest there. Your entry sits near structure, which lets your stop sit close to structure. That proximity is what makes Gate 5 (risk:reward) work later.
- Too deep (past ~66–78%): the pullback has eaten most of the impulse. When retracement runs that deep, the "trend continuation" thesis is on thin ice — you're increasingly likely watching a full reversal, not a dip to buy.
The zone is a filter for location, not a trigger by itself. Price reaching the golden pocket doesn't mean "enter." It means "now you're allowed to look for a reason to enter" — which is the next gate. Plenty of pullbacks reach the zone and then keep right on going. That's fine. That's what Gate 3 is for.
Gate 3: Did a confirmation candle close at the level?
A wick into the level is a rumor; a close at the level is a fact. This is the gate that filters out the majority of pretty-looking pullbacks. Price touching your zone is not confirmation — price closing inside or off your zone is.
A confirmation candle is a completed candle that closes at or off the retracement level in the direction of the original trend, signaling that the level is being defended rather than merely tagged. The distinction is everything: a long lower wick that pierces the zone and closes back above it tells you buyers stepped in and won the candle. A candle that closes deep inside the zone with a weak body tells you nothing has been decided yet.
Why insist on the close?
- Wicks lie, closes commit. Intrabar, price visits all sorts of levels it won't hold. Only the close reflects where the auction actually settled for that period.
- It stops you front-running. Entering on a wick touch is entering on hope. Waiting for the close means you're acting on evidence the level is holding.
- It defines your entry and stop. Entry is on the break of the confirmation candle; the stop goes just beyond the extreme it defended — which gives you two precise, non-arbitrary prices instead of a guess.
This is why reading closed candles only — never the still-forming one — matters so much, and why it's worth understanding what a confirmation candle is and how to read one before you trust any level. A method that reacts to a live, unclosed candle is reacting to noise that can vanish before the bar ends. Waiting for the close is slower and it feels like you're "missing" the move. You're not. You're refusing to act on information that isn't final yet.
Gate 4: Is the market actually trending?
Even a textbook pullback-and-confirmation is a low-quality setup if the market is chopping. Fibonacci continuation logic assumes there's a trend to continue. In a sideways, range-bound market, levels get tagged and rejected in both directions and your "setup" is just noise inside a box.
A trend filter is a check on whether directional strength actually exists — commonly an ADX-style reading that rises when a market is trending and stays low when it's ranging. The point isn't the specific indicator; it's the question: is there a prevailing direction for this continuation setup to lean on, or am I trying to trade continuation in a market that has nothing to continue?
What this gate protects you from:
- The range trap. In a range, the same level that looks like support today becomes resistance tomorrow. Continuation setups have poor context here because there's no dominant side.
- Choppy whipsaws. Low-trend environments are where confirmation candles form, trigger, and immediately fail — because there's no momentum behind the break.
- Over-trading flat markets. A trend filter naturally reduces how often you're allowed to trade, which is a feature, not a bug (see the final section).
Note that a strong trend reading is not permission to skip the first three gates — it's the fourth condition, applied on top of a valid impulse, pullback, and confirmation. A trending market with no clean setup is still a no-trade. All the gates stack; none replace each other.
Gate 5: Is the reward worth the risk?
A perfect-looking pattern with a bad payoff is a bad trade. The final gate is arithmetic, not chart-reading: measure the distance from your entry to your stop (the risk) against the distance from your entry to a sensible target (the reward), and reject anything where the reward doesn't clearly justify the risk.
Risk:reward (R:R) is the ratio between what you stand to lose if the stop hits and what you stand to gain if the target hits — a structural check on whether a trade is worth taking at all, independent of how good the chart looks. A setup that clears Gates 1–4 but only offers a target barely further than the stop is one to pass on.
Here's how the earlier gates feed this one:
- The stop is defined by structure, not by feel. It sits just beyond the extreme the confirmation candle defended — and it's ATR-floored, meaning it's pushed out to at least a volatility-based minimum distance so normal market noise doesn't stop you out prematurely.
- The entry is the break of the confirmation candle — a specific price, not a range.
- The target is a natural extension. The 1.618 Fibonacci extension of the impulse is a logical objective, because it projects the move's own scale forward.
Because entry, stop, and target are all defined by the structure of the setup rather than picked out of the air, the R:R is knowable before you enter. If the math is poor, it doesn't matter how clean the candles looked — the trade fails the checklist. This gate is where discipline gets tested most, because it forces you to walk away from good-looking charts with bad geometry.
Why do fewer, higher-quality setups matter?
Because a filter that rejects almost everything is doing exactly what a filter is for. When you demand all five gates, the overwhelming majority of candidates die somewhere in the pipeline — and that culling is the entire point. Quality over quantity in trading isn't a motivational slogan; it's what five stacked vetoes mechanically produce.
Consider what each gate removes:
- Congestion masquerading as an impulse — gone at Gate 1.
- Shallow dips and deep collapses — gone at Gate 2.
- Wick-touches that never confirm — gone at Gate 3.
- Setups inside choppy, directionless markets — gone at Gate 4.
- Clean patterns with lousy payoff geometry — gone at Gate 5.
Whatever survives all five has an impulse behind it, a location that made sense, evidence the level held, a trend to lean on, and arithmetic that adds up. That is a defined trade: you know your entry, your stop, and your target before you commit, and you know why each one is where it is. You can journal it, review it, and repeat it — which is the only way to actually improve.
The hard part is the discipline. Every rejected candidate feels like a missed opportunity, and sitting on your hands while the market moves is genuinely uncomfortable. But a checklist only works if you let it say no. The traders who struggle aren't usually the ones who can't find setups — they're the ones who can't decline the almost-setups.
Where the consistency of the process actually pays off
Here's the operational problem: applying five gates faithfully across every market and timeframe, on closed candles only, without letting excitement override the checklist, is exhausting to do by hand. You can't watch 293 markets across 8 timeframes — crypto, FX, gold, indices, commodities — and you certainly can't apply five gates to all of them, every candle, without blinking. That's the work a scanner is for: FibScanner watches all of them and only pings you when a candidate has cleared every gate, so your job shrinks to the one thing a machine shouldn't do — deciding whether to take the trade in front of you. It reads only closed candles and logs every call it makes, so the filter stays strict rather than drifting to find you something to do. You can run the full engine free on one market and one timeframe to see the checklist working, and the full method guide walks through each gate in depth. Try the free tier and watch the gates in action.
Frequently asked questions
What makes a good trade setup, in one sentence?
A good trade setup is one where a genuine impulse, a pullback into the retracement zone, a confirmation candle that closes at the level, a trending market, and a risk:reward worth taking are all true at the same time. Any single one missing turns it into a no-trade. The quality comes from the combination, not from any one signal.
How many of the five gates can I skip?
None. Each gate is a veto, so passing four of five is still a reject, not "almost there." The whole value of the checklist is that it forces every condition to be present before you risk money — if you start skipping gates, you've simply lowered your standard back to trading noise.
Isn't waiting for a candle to close going to make me miss trades?
You'll miss some fast moves, yes — and that's an acceptable cost. Acting on an unclosed candle means acting on information that can reverse before the bar ends, which is how confirmation "signals" turn into losses. A missed trade costs you nothing; a bad trade taken on a wick that never closed costs you real money.
What's the difference between a pullback into the zone and a reversal?
A pullback retraces part of the impulse and holds — typically stalling in the ~45–66% band — before continuing in the original direction. A reversal keeps going past that zone, eating most or all of the impulse, which signals the prior move has likely failed rather than paused. That's exactly why Gate 2 rejects retracements that run too deep.
Does this checklist work on any market or timeframe?
The logic is market-agnostic: impulse, pullback, confirmation, trend, and risk:reward apply to crypto, FX, gold, indices, and commodities alike, and on everything from intraday to higher timeframes. What changes between markets is volatility and pace, which is why the stop is ATR-floored rather than a fixed distance. The gates stay the same; the numbers scale to the instrument.
